Getting Started with Tree Planting
How Do I Choose the Right Tree for My Property?
Selecting the right tree for your property is the first step in ensuring long-term success. Here’s how to make a choice that will thrive:
- Consider Your Climate: Make sure the tree you choose is suitable for your region’s hardiness zone. For example, if you’re in zone 4b, you’ll want trees that can tolerate cold temperatures.
- Think About Space: Trees need room to grow, both above and below ground. Check the tree’s mature height and spread to make sure it won’t interfere with structures or other plants.
- Purpose of the Tree: Are you looking for shade, beauty, privacy, or windbreaks? Select trees that match your goals. For instance, evergreens are great for privacy, while flowering trees like crabapples are ideal for ornamental appeal.
- Soil Type and Drainage: Different trees have different soil preferences. Some like well-drained, sandy soils, while others tolerate clay. Ensure the tree you pick matches your soil conditions or amend the soil before planting.
What’s the Best Time of Year to Plant a Tree?
The timing of your tree planting can significantly impact its success. Here’s what to consider:
- Ideal Planting Season: The best times to plant trees are in the spring or fall. These seasons provide mild temperatures and adequate moisture for roots to establish before the stress of summer heat or winter cold.
- Spring: Planting early in spring gives trees a full growing season to establish before the weather gets hot.
- Fall: Fall planting works well because the soil is still warm, allowing roots to grow deeper before the tree goes dormant in winter.
- Avoid Planting in Extreme Weather: Avoid planting trees in the dead heat of summer or during extreme cold spells in winter. The stress of heat or frost can damage newly planted trees and inhibit root establishment.
How Do I Prepare the Soil for Planting?
Proper soil preparation is key to giving your new tree a strong start. Here’s how to prepare:
- Test Your Soil: Before planting, test your soil for pH, nutrient levels, and drainage. This can help you understand if the soil needs amending. Many trees prefer slightly acidic to neutral soil (pH 6.0 to 7.0).
- Loosen the Soil: If the soil is compacted, dig a hole that’s at least twice as wide as the root ball but no deeper than the root depth. Loosen the surrounding soil to encourage the tree’s roots to spread easily.
- Avoid making the hole too deep as this can cause the tree to settle too far down and may lead to root rot.
- Improve Drainage: If your soil is heavy clay, which can retain water and suffocate roots, mix in organic matter like compost or mulch to improve drainage. If you have sandy soil, you may need to add organic material to help retain moisture.
- Mulch and Fertilize: Add a layer of mulch around the tree after planting to retain moisture and keep the soil temperature stable. Be cautious not to pile mulch directly against the tree trunk, as this can cause rot. For fertilizers, use a balanced formula to give your tree the nutrients it needs for healthy growth.
Tree Propagation Basics
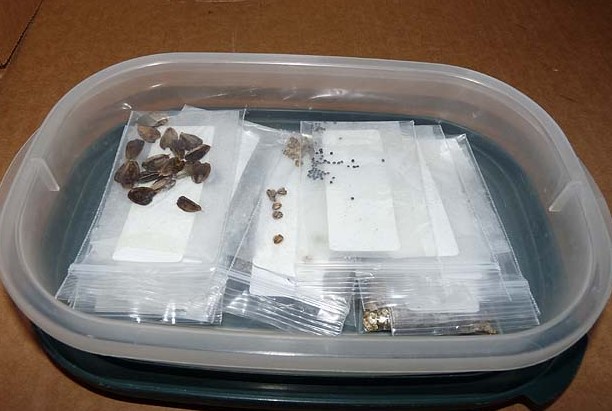
Tree propagation is the process of growing new trees from existing ones, whether through seeds, cuttings, or saplings. Whether you’re looking to expand your tree collection or create more trees for your landscape, understanding the basics of propagation will help ensure your success.
What is the Difference Between Planting Seeds and Saplings?
Understanding the difference between seeds and saplings is crucial for effective tree propagation. Here’s a breakdown:
- Seeds: Growing trees from seeds is a more time-consuming process, but it can be rewarding. Seeds need to undergo certain processes (like stratification or scarification) to break dormancy and germinate. The tree that grows from a seed will take several years to reach maturity, depending on the species.
- Pros: It’s a cost-effective method and offers genetic diversity.
- Cons: It can take a long time for trees to grow from seeds, and there’s a higher risk of failure if not properly cared for during germination.
- Saplings: Saplings are young trees that have already grown for a period in a nursery or similar controlled environment. These trees are typically sold as bare-root or potted, ready for transplanting.
- Pros: Saplings are established and typically have a better chance of survival because they already have a root system and are better acclimated to their environment.
- Cons: Saplings can be more expensive than seeds and may not offer the same variety of species that you can grow from seed.
Can I Propagate Trees at Home?
Yes, you can propagate trees at home! There are several methods for doing this, including growing trees from seeds, taking cuttings, or grafting. Here are the basics for each method:
- From Seeds: Most trees can be propagated from seeds, though some may require specific conditions to germinate. Some seeds, like those of oak or maple, may need to be stratified (chilled for a period of time) to break dormancy before they’ll germinate. Others, like pine seeds, might require scarification (scratching or scoring the seed coat) to promote germination.
- From Cuttings: Many tree species can be propagated through cuttings. A cutting is a piece of stem, root, or branch that’s taken from a mature tree and encouraged to root in a suitable medium. Softwood cuttings (taken in spring or early summer) are the most common for tree propagation, but hardwood cuttings (taken in late fall or early winter) work for some species.
- Tip: Make sure to select healthy, disease-free cuttings, and always use clean, sharp tools to avoid contamination.
- From Grafting: This is a more advanced method but can be useful for propagating fruit trees or trees with desirable characteristics. Grafting involves joining the stem of a desired tree (scion) to a rootstock. This is often done in commercial tree nurseries or by experienced gardeners.
How Do I Care for Cuttings to Ensure They Root?
When propagating trees from cuttings, ensuring that the cutting develops roots is key to success. Here’s how to care for your cuttings:
- Select Healthy Cuttings: Choose a healthy, disease-free branch. The cutting should be about 4-6 inches long with at least two nodes (where leaves or buds emerge).
- Use Rooting Hormone: To encourage root development, dip the cut end of your cutting into rooting hormone. This will promote faster and more robust root growth. Be sure to tap off any excess hormone, as too much can inhibit rooting.
- Prepare the Medium: Use a well-draining medium like a mix of perlite and peat or a commercially available rooting mix. The cutting should be inserted into the medium deep enough to support the cutting but not so deep that it rots.
- Maintain Proper Humidity: Place the cutting in a humid environment to prevent it from drying out. You can cover the cutting with a plastic bag or use a humidity dome. However, ensure that the environment has adequate airflow to avoid mold or fungus growth.
- Provide the Right Temperature: Most tree cuttings root best in warm temperatures, around 65-75°F (18-24°C). Keep the cutting in a warm, well-lit area but out of direct sunlight to avoid overheating.
- Watering and Monitoring: Keep the rooting medium moist but not waterlogged. Check the cutting regularly for signs of root growth, which can take anywhere from a few weeks to a few months depending on the species. After the roots are established, gradually acclimate the cutting to outdoor conditions before transplanting it to its permanent location.
Tree Planting Techniques
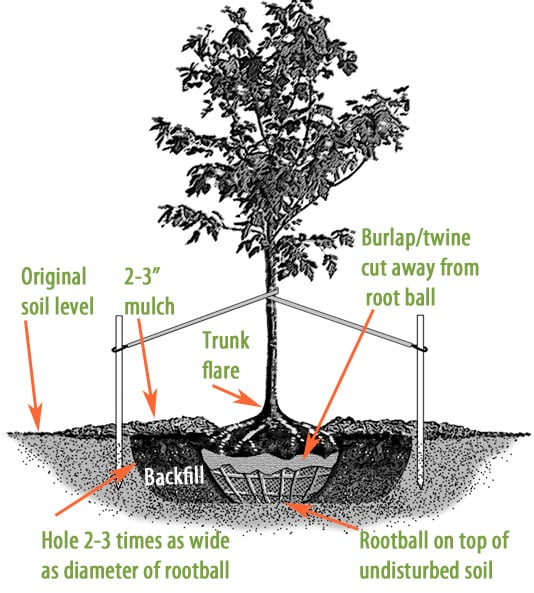
Proper tree planting is crucial for ensuring your tree’s long-term health and success. Whether you’re planting a sapling or a larger tree, following correct planting techniques can make all the difference. In this section, we’ll cover key aspects of planting, such as depth, staking, and avoiding transplant shock.
How Deep Should I Plant a Tree?
Planting depth is one of the most important factors in ensuring your tree’s health and stability. Planting a tree too deep or too shallow can affect its root system and hinder its growth.
- Correct Depth: The general rule is to plant the tree at the same depth it was in the container or root ball. You want the top of the root ball to be level with the surrounding soil surface. For balled-and-burlapped trees, make sure the root flare (where the trunk meets the roots) is visible above the soil.
- Avoid Planting Too Deep: If you plant too deeply, the roots may not receive enough oxygen, and the tree may struggle to establish itself. In extreme cases, it can lead to root rot or other diseases. The root flare should always be above the soil surface to prevent it from being buried.
- Don’t Plant Too Shallow: While it’s important to plant at the correct depth, planting too shallow can expose the roots to the elements, leading to dehydration and stress. Also, the tree may be more susceptible to physical damage from wind or wildlife.
Should I Stake My Tree After Planting?
Staking is often recommended for newly planted trees, but it should be done correctly to avoid damaging the tree.
- When to Stake: Staking is particularly useful for tall or top-heavy trees that have a weak root system or in areas prone to strong winds. Staking helps the tree establish its roots by limiting movement, which can stress the tree and delay root development.
- How to Stake: Use a soft material, such as tree ties or webbing, to avoid damaging the bark or causing girdling. The stake should be tall enough to support the tree without restricting its growth. Ideally, stakes should be placed in two or three locations around the tree, creating a tripod-like structure to prevent leaning.
- Time to Remove Stakes: Stakes should not be left in place indefinitely. Over time, the tree needs to be able to sway slightly in the wind to strengthen its trunk and root system. Remove the stakes after 1-2 growing seasons, or as soon as the tree is established and no longer needs additional support. Leaving stakes in place too long can hinder the tree’s natural growth and root development.
How Can I Avoid Transplant Shock?
Transplant shock occurs when a tree’s root system is disturbed during the planting process, causing stress and slowing its growth. While some degree of shock is natural after transplanting, there are steps you can take to minimize it.
- Watering: Proper watering is essential for minimizing transplant shock. After planting, water the tree deeply to help settle the soil around the roots and eliminate air pockets. For the first few months, ensure the tree receives consistent moisture, but avoid overwatering, as soggy soil can cause root rot. A deep watering every 2-3 days is generally sufficient in the early stages, depending on your soil and weather conditions.
- Avoid Root Damage: Be gentle with the roots when transplanting. If the tree is in a container, gently remove it, ensuring the roots aren’t disturbed excessively. If it’s balled-and-burlapped, carefully remove the burlap, wires, or any synthetic materials that might constrict the roots.
- Soil Amendments: Ensure the soil is well-draining, as compacted or waterlogged soil can exacerbate transplant shock. If your soil is heavy or clay-like, consider amending it with organic matter like compost or peat moss to improve aeration and water retention.
- Mulching: Mulching around the base of the tree helps retain moisture, moderate soil temperature, and reduce competition from weeds. Apply mulch to a depth of 2-4 inches, but avoid piling it against the trunk, which can cause rot.
- Shade and Protection: During the first few weeks, providing some shade or protection from strong winds can help the tree acclimate. You can use shade cloth or a temporary windbreak to reduce environmental stress while the tree establishes itself.
- Fertilization: Avoid fertilizing immediately after planting, as this can put additional stress on the tree. Wait at least 6-8 weeks before applying any fertilizer. Once the tree has had time to adjust, slow-release fertilizer can be applied to encourage new root and leaf growth.
Watering and Fertilization
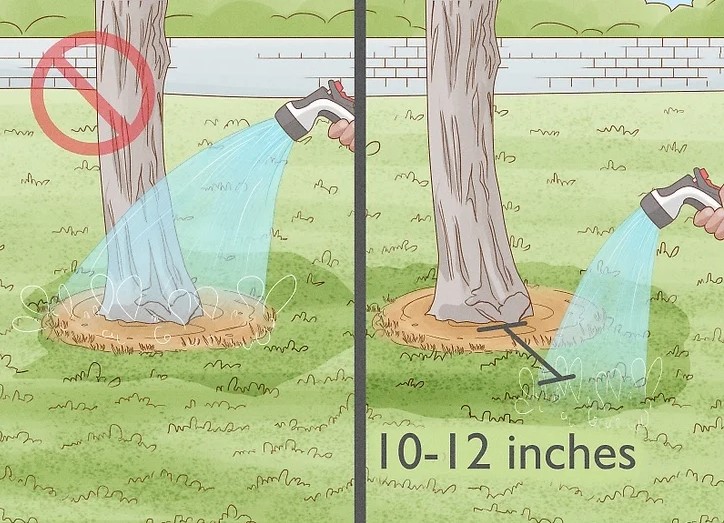
Proper watering and fertilization are essential for the establishment and long-term health of newly planted trees. Understanding the specific needs of your tree during its early years can make a significant difference in its survival and growth. In this section, we’ll cover the best practices for watering and fertilizing newly planted trees, along with information on tree species that may require minimal or no fertilization.
How Often Should I Water a Newly Planted Tree?
Watering is critical immediately after planting and during the first few years of growth. Newly planted trees are establishing their root systems, which are vital for absorbing nutrients and water from the soil.
- Frequency of Watering: Newly planted trees should be watered deeply, at least once a week, for the first few months, or more often if the weather is especially hot or dry. The goal is to keep the root zone moist but not waterlogged. The tree’s root system is still growing and may not yet have access to a large volume of water from the surrounding soil.
- How Much Water? Deep watering is essential to encourage roots to grow deep into the soil. A slow soak, allowing water to penetrate at least 12 inches deep, will help promote deep rooting. You can use a soaker hose, a drip irrigation system, or a watering can to water slowly and evenly.
- Signs of Under or Overwatering: Signs of underwatering include wilting, dry or cracked soil, and yellowing leaves. Overwatering can result in waterlogged soil, leading to root rot, and may manifest as yellow or drooping leaves, or mold and fungus in the soil. Adjust your watering based on rainfall, soil type, and weather conditions to avoid either extreme.
- Watering During Winter: In winter, trees still need water, especially if the weather is dry and the soil is not frozen. However, it’s important not to water when the ground is frozen, as this will not benefit the tree. Watering during warmer winter days can help keep the tree hydrated and prevent dehydration during the colder months.
What Type of Fertilizer Should I Use?
Fertilizing newly planted trees can give them a boost, especially in poor or nutrient-depleted soil. However, it’s important to use the right type of fertilizer and to apply it correctly to avoid stressing the tree.
- Slow-Release Fertilizers: Slow-release or controlled-release fertilizers are generally the best choice for newly planted trees. They provide a steady supply of nutrients over time, ensuring the tree’s root system receives consistent nourishment without overwhelming it with too much fertilizer at once.
- Balanced Fertilizers: Look for a balanced fertilizer, such as a 10-10-10 (NPK) blend, that contains equal parts nitrogen (N), phosphorus (P), and potassium (K). These nutrients support overall tree health, with nitrogen promoting leafy growth, phosphorus aiding in root development, and potassium supporting overall plant strength.
- Fertilizer Timing: For the first year after planting, it’s often better to avoid heavy fertilization. Trees typically do well with the nutrients available in the soil, and adding too much fertilizer can cause excessive top growth and stress the roots. After the first year, a light application of fertilizer in early spring or late fall, when the tree is not actively growing, can help promote healthy growth.
- Organic Fertilizers: Organic fertilizers, such as compost, well-rotted manure, or organic-based tree food, can also be used. These are gentle on newly planted trees and can improve the structure of the soil over time.
- Avoid Fertilizing in the First Few Weeks: Newly planted trees are already under stress from transplanting. Fertilizing too soon after planting can cause fertilizer burn and stress. Wait at least six to eight weeks before applying any fertilizer to give the tree time to establish itself.
Are There Trees That Don’t Need Fertilizer?
While most trees benefit from occasional fertilization, some species thrive without the need for supplemental fertilizers, especially if planted in nutrient-rich soils.
- Native Trees: Many native tree species are adapted to the local soil conditions and may not require additional fertilization. These trees have evolved with the local ecosystem and often find sufficient nutrients in the natural soil. Some examples include oaks, maples, pines, and birches, which typically need little to no supplemental feeding once established.
- Drought-Tolerant Trees: Trees that are drought-tolerant or adapted to arid conditions, such as certain types of junipers or desert species, can often thrive without fertilizer. They are adapted to low-nutrient soils and do not rely on high levels of fertilization.
- Trees in Rich, Well-Drained Soil: If the soil in your planting area is rich in organic matter and drains well, your tree may not need additional fertilization. Many trees, especially those in areas with fertile soils, can grow well without additional nutrients.
- Signs Your Tree Might Not Need Fertilizer: If your tree is healthy, growing well, and showing no signs of nutrient deficiency (such as yellowing leaves or stunted growth), it may be able to thrive without fertilizer. Over-fertilizing can harm the tree, leading to excess foliage growth at the expense of root development.
Pruning and Maintenance
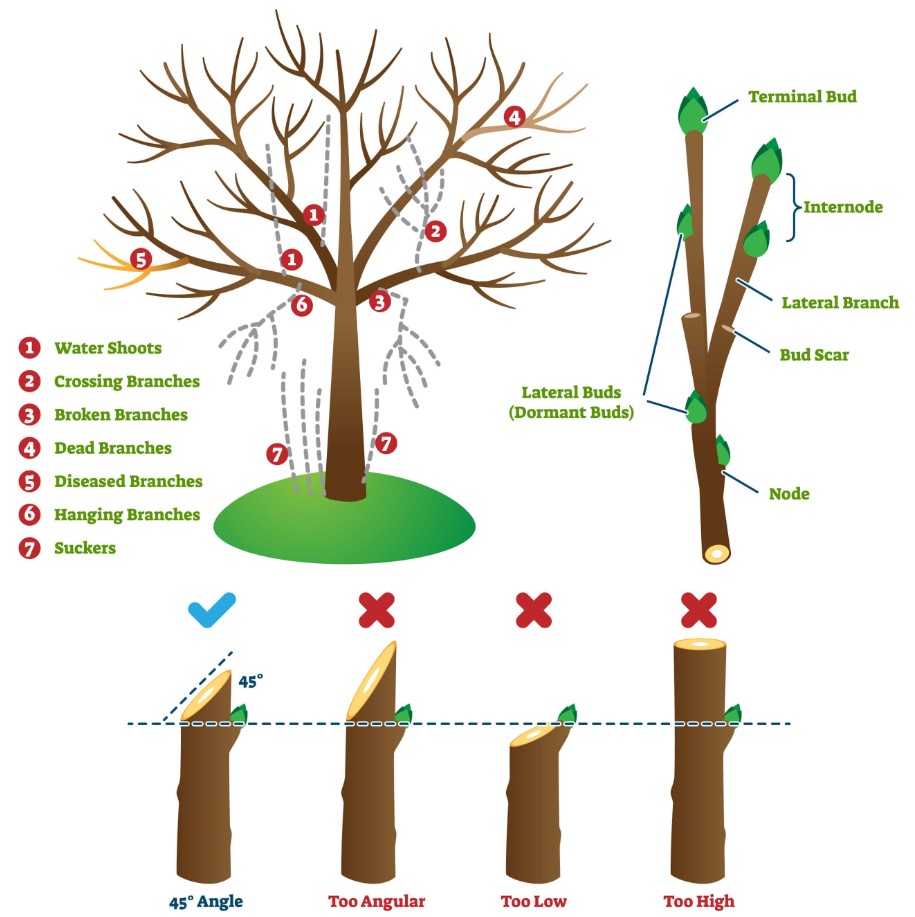
Proper pruning and regular maintenance are essential for the health, shape, and longevity of your trees. It helps to promote strong growth, remove damaged or diseased wood, and ensure the tree maintains its desired form. In this section, we’ll cover key pruning practices and maintenance tips to keep your tree healthy and thriving.
When is the Best Time to Prune My Tree?
Timing is crucial when it comes to pruning trees. Pruning at the wrong time can stress the tree or disrupt its growth cycles. The best time to prune will depend on the tree species and the purpose of pruning.
- Dormant Season (Late Fall to Early Spring): For most deciduous trees, the best time to prune is during the dormant season, which typically occurs in late fall or early spring. This is when the tree is not actively growing, reducing the risk of sap loss and minimizing stress. It also allows you to see the tree’s structure clearly, without the obstruction of leaves.
- After Flowering (For Flowering Trees): If you’re pruning a flowering tree, it’s best to prune it right after it blooms. This will allow the tree to set new buds for the next flowering season. Pruning too late in the season can remove the buds and reduce the number of flowers the tree will produce.
- Avoid Pruning During Extreme Weather: Avoid pruning during periods of heavy heat, drought, or frost. Pruning during these times can stress the tree further, particularly when it is already under environmental stress.
- For Evergreen Trees: Evergreen trees can typically be pruned during late spring or early summer after their new growth has started, as they do not have a dormant period. However, avoid pruning them too late in the year, as new growth may not have enough time to harden off before the first frost.
How Do I Trim Branches Without Harming the Tree?
Pruning, when done correctly, can help a tree remain healthy, but improper cutting can lead to damage and slow growth. Here are some guidelines to help you trim branches safely:
- Use Clean, Sharp Tools: Always use sharp, clean pruning shears, loppers, or a saw. Dull or dirty tools can damage the tree, tear the bark, and introduce disease. Sterilizing your tools before use (especially when moving between different trees) can also prevent the spread of pathogens.
- Make Clean Cuts: When cutting branches, aim to make clean cuts just outside the branch collar (the raised area where the branch meets the trunk). Avoid cutting into the collar, as this area is vital for the tree’s natural healing process. Making a clean, angled cut helps the tree heal faster and prevents the development of decay.
- Prune with Purpose: Focus on pruning for the health of the tree, rather than just for appearance. Remove any dead, damaged, or diseased branches first. If you’re shaping the tree, aim for a balanced structure, removing any crossing or rubbing branches. Always step back and assess the tree’s overall shape before making cuts.
- Avoid Topping: Topping, or cutting off the top of a tree to reduce height, is an extremely damaging practice that should be avoided. It can weaken the tree and promote weak growth that is more susceptible to disease. Always prune branches back to lateral branches that are at least one-third the size of the branch being removed.
- Remove Suckers and Water Sprouts: Suckers are shoots that grow from the base of the tree or from the roots, while water sprouts grow from the branches. These can rob the tree of nutrients and detract from its shape. Remove them promptly to prevent unnecessary growth and to keep the tree focused on healthy, vertical growth.
Should I Remove Dead or Damaged Limbs Immediately?
Yes, removing dead, damaged, or diseased limbs as soon as possible is important for maintaining the health of your tree. Here’s why:
- Prevent Disease and Pests: Dead or damaged branches are more susceptible to disease and pests, which can spread to the rest of the tree. For example, fungal infections, rot, and wood-boring insects often infest weakened wood. Promptly removing such limbs reduces the risk of spreading these problems to the rest of the tree.
- Encourage Healthy Growth: By removing dead or damaged branches, you encourage the tree to redirect energy to healthy growth. Without the drain from dying or diseased wood, the tree can focus its resources on developing strong, healthy branches and roots.
- Aesthetics and Safety: Dead or broken branches can also pose a safety hazard, especially if they are large or overhanging paths, driveways, or structures. Removing them helps prevent accidents, particularly during storms or high winds when such branches are more likely to fall.
- How to Remove Dead Limbs Safely: When cutting away dead or damaged limbs, be sure to cut just outside the branch collar. For large limbs, use a three-cut method to prevent tearing the bark. The first cut should be a notch beneath the limb, the second should be on top of the limb further out, and the final cut should remove the remainder of the limb, leaving a clean collar for healing.
Protecting Trees from Pests and Diseases
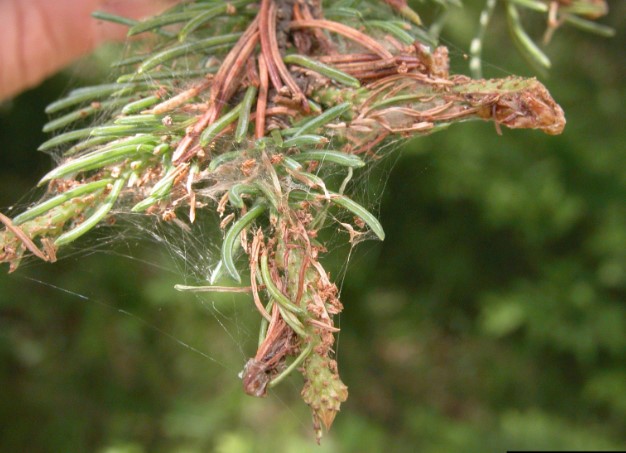
Maintaining the health of your trees involves not only proper care and maintenance but also protecting them from potential pests and diseases. These threats can weaken your tree, cause irreversible damage, or even lead to death if not addressed promptly. In this section, we’ll explore common pests and diseases that affect trees, how to spot the signs of infestation or infection, and effective strategies to treat or prevent these issues.
What Are Common Signs of Tree Pests?
Pests can cause a range of symptoms that indicate a tree is under attack. Recognizing these signs early can help you take swift action to prevent further damage. Here are some of the most common signs of tree pests:
- Chewed or Damaged Leaves: If you notice holes, missing patches, or chewed edges on leaves, this may indicate insect pests like caterpillars, beetles, or aphids. Some pests, like leaf miners, burrow inside the leaves, causing them to become discolored or curled.
- Visible Insects: Sometimes, the pests themselves are visible on the tree. Common culprits include aphids, scale insects, and spider mites. If you see insects moving or clustered on leaves, stems, or branches, it’s a good indication that they are causing damage.
- Discolored or Stunted Growth: If your tree’s leaves turn yellow, brown, or show spots, it could be due to an infestation of pests like aphids, whiteflies, or thrips. These insects suck sap from the tree, weakening it and causing poor growth and discoloration.
- Sticky or Glued Surfaces: Pests like aphids and scale insects excrete a sugary substance called honeydew, which can coat leaves, branches, and the ground beneath the tree. This sticky residue may attract other pests or cause the growth of black mold.
- Galleries and Holes in the Bark: Certain pests, like wood borers and beetles, tunnel into the tree’s bark, leaving behind holes or galleries (long, winding tunnels). These pests can weaken the tree’s structure and provide an entry point for pathogens.
- Wilting or Drooping Limbs: If branches start to droop or show signs of wilting despite adequate watering, it may be a sign of pest damage. Root-feeding insects like root weevils can damage the tree’s root system, leading to poor water uptake.
How Do I Treat Fungal Diseases?
Fungal infections are common threats to tree health, and various fungi can cause a range of symptoms, including leaf spots, cankers, root rot, and dieback. The following treatment methods can help manage fungal diseases:
- Identify the Disease: Properly diagnosing the fungal infection is essential for effective treatment. Common tree fungal diseases include powdery mildew, rusts, cankers, and root rot. Symptoms like discolored leaves, abnormal growth, or bleeding from wounds may be indicative of fungal issues.
- Prune Infected Branches: Removing infected or diseased branches is crucial in controlling the spread of fungal infections. Always use sterilized pruning tools to prevent spreading the fungus to healthy parts of the tree or to other trees. Dispose of the infected wood properly—don’t leave it in the yard, as it could harbor spores.
- Apply Fungicides: In some cases, fungicides may be necessary to treat or prevent fungal infections. Look for fungicides that are labeled for use on trees, and always follow the manufacturer’s instructions. Some fungicides are systemic, meaning they are absorbed by the tree and can help protect it from within, while others are contact-based, targeting the fungus directly.
- Improve Tree Health: A tree that is stressed or weakened is more susceptible to fungal infections. Ensure your tree has adequate water, proper nutrients, and appropriate sunlight. Avoid over-fertilizing, as this can encourage excessive growth that is more vulnerable to infection.
- Improve Air Circulation: Fungi thrive in damp, shaded environments. Pruning trees to allow for better airflow through the canopy can reduce humidity around the tree and decrease the chances of fungal infections.
- Treat Root Rot: If your tree is affected by root rot, treatment can be more challenging. Removing infected roots is often necessary, but if the disease is widespread, the tree may need to be removed. Additionally, improving soil drainage and avoiding overwatering can help prevent future occurrences.
Are There Natural Ways to Keep Pests Away?
While chemical pesticides are an option, there are many natural ways to control tree pests without relying on harsh chemicals. Here are some organic methods to keep pests at bay:
- Beneficial Insects: One of the most effective natural pest control methods is the introduction of beneficial insects. Predators like ladybugs, lacewings, and predatory beetles feed on harmful insects such as aphids, mites, and caterpillars. Encouraging these beneficial insects in your garden can help keep pest populations under control.
- Neem Oil: Neem oil is a natural pesticide derived from the seeds of the neem tree. It is effective against a wide range of pests, including aphids, whiteflies, and scale insects. Neem oil works by disrupting the pests’ ability to feed, breed, and grow, reducing their population over time.
- Insecticidal Soap: Insecticidal soap is another safe, non-toxic option for treating pests like aphids and spider mites. It works by suffocating the insects and can be sprayed directly onto the tree’s leaves and branches. Be sure to apply it during the cooler parts of the day to avoid leaf burn.
- Diatomaceous Earth: This natural powder, made from the fossilized remains of diatoms, works as a physical barrier to insect pests. When insects come into contact with diatomaceous earth, it damages their exoskeleton, causing dehydration and death. It is especially effective for pests like ants, beetles, and slugs.
- Companion Planting: Some plants, such as marigolds, garlic, and lavender, are known to repel certain tree pests. By planting these around your trees or in nearby garden beds, you can create a natural pest deterrent. For example, garlic can help repel aphids and other insects, while marigolds attract beneficial insects that prey on pests.
- Mulching and Traps: Organic mulches, such as wood chips or straw, can create a habitat for beneficial insects while helping to suppress pests. Traps, like sticky traps for aphids or pheromone traps for beetles, can help monitor and reduce pest populations.
- Regular Monitoring: Regularly inspect your trees for early signs of pest infestations. Catching problems early makes it easier to manage them naturally without the need for chemical interventions. Keeping the surrounding area clean and free of debris can also discourage pests from taking hold.
Caring for Young Trees
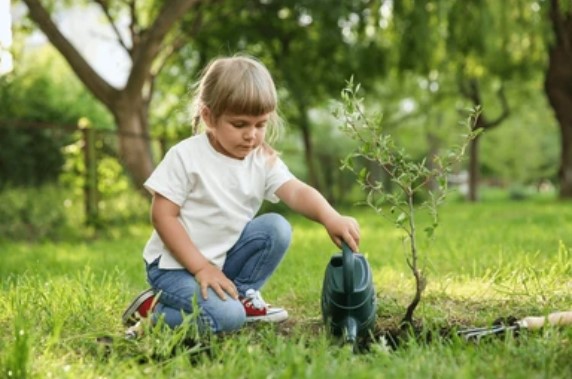
Young trees, or saplings, are vulnerable and require special care to ensure they grow strong and healthy. Providing them with the right conditions in their early stages can help set them up for long-term success. In this section, we’ll explore the key considerations for protecting saplings from harsh weather, knowing the right time to plant them in the ground, and avoiding common mistakes that can stunt their growth.
How Do I Protect Saplings from Harsh Weather?
Young trees are especially sensitive to extreme weather conditions, such as strong winds, heavy rain, freezing temperatures, and intense heat. Here are some strategies to protect your saplings from the elements:
- Wind Protection: Young trees have shallow root systems, making them susceptible to wind damage. If you live in a windy area, consider installing windbreaks or planting your saplings in a more sheltered location. You can also use tree shelters or staking to offer extra support during their early growth.
- Frost Protection: Freezing temperatures can damage young trees, particularly those that are not yet well-established. If a cold snap is expected, cover your saplings with frost cloths, burlap, or other breathable materials. Additionally, consider using mulch around the base of the tree to insulate the roots and protect them from freezing.
- Heat and Sun Protection: Hot, direct sunlight can dry out the soil and stress young trees. For saplings planted in full sun, consider providing temporary shade during the hottest part of the day using shade cloth, a canopy, or other shading devices. Watering early in the morning and mulching around the base can also help retain moisture in the soil.
- Watering in Extreme Weather: During droughts or hot weather, saplings will need regular watering. Water them deeply, ensuring that the roots are thoroughly soaked. Avoid watering just the surface of the soil, as this can lead to shallow root growth. During excessive rainfall or flooding, ensure that the sapling’s planting site has good drainage to prevent waterlogging, which can damage the roots.
When Should I Move a Potted Tree into the Ground?
Transplanting a tree from a pot into the ground is a crucial step in its development. Moving the tree at the right time will ensure it adjusts well to its new environment. Here’s when and how to transplant a potted tree:
- Optimal Timing: The best time to move a potted tree into the ground is during its dormant season, typically in early spring or late fall. During these times, the tree is not actively growing, which reduces the stress of transplanting. Avoid transplanting during the peak of summer heat or in the middle of the growing season when the tree may be stressed and less likely to establish well.
- Preparation of the Planting Site: Before transplanting, prepare the planting site by digging a hole that’s at least twice as wide as the root ball of the potted tree. Ensure that the soil is loose and well-drained to allow the roots to spread easily. If your soil is heavy clay, you may need to amend it with compost or other organic matter to improve drainage.
- Transplanting Process: When removing the tree from its pot, handle it carefully to avoid damaging the roots. Gently loosen the roots if they are circling the pot. Place the tree in the hole at the same depth it was planted in the pot, making sure the root flare (where the trunk meets the roots) is level with or slightly above the surrounding soil.
- Aftercare: After transplanting, water the tree deeply and mulch around the base to retain moisture. Monitor the tree closely over the following weeks to ensure it’s settling into its new location. If the weather is dry, make sure to water the tree regularly to encourage root establishment.
What Are Common Mistakes When Raising Young Trees?
Caring for young trees requires attention and patience, and there are several common mistakes that can hinder their growth. Avoiding these pitfalls will help your saplings grow into healthy, strong trees:
- Overwatering or Underwatering: Watering is one of the most critical aspects of tree care, and it’s easy to go overboard or neglect the tree’s water needs. Young trees need consistent moisture, but they also require well-drained soil to avoid root rot. Be mindful of the soil moisture level, and ensure that the tree isn’t sitting in waterlogged soil.
- Planting Too Deep or Too Shallow: Planting a tree too deep can suffocate its roots and prevent it from growing properly, while planting too shallow can expose the roots to drying out or damage. Be sure to plant the sapling at the right depth, where the root flare is just above the soil level.
- Not Providing Enough Mulch: Mulch serves many purposes, including moisture retention, temperature regulation, and weed control. Young trees benefit from a layer of mulch around their base to protect the roots. However, be sure not to pile mulch against the trunk, as this can cause rot and attract pests.
- Lack of Proper Support: Staking is often necessary for saplings, especially if they are planted in windy areas. Failing to stake a young tree or using improper staking techniques can result in the tree becoming misshapen or unable to establish a strong root system. Use soft ties and ensure that stakes are placed properly to support the tree without restricting its growth.
- Not Pruning Young Trees: Some tree owners mistakenly believe that young trees don’t need pruning. While pruning is essential for shaping and encouraging strong, healthy growth, it’s important to do it properly. Avoid heavy pruning, which can stress the tree, and focus on removing dead or damaged branches and shaping the tree to promote good structure.
- Ignoring Pests and Diseases: Young trees are especially vulnerable to pests and diseases. Not checking regularly for signs of pests or disease can lead to serious damage before it’s noticed. Regular monitoring and early intervention are key to preventing these issues from harming your tree.
Long-Term Tree Care
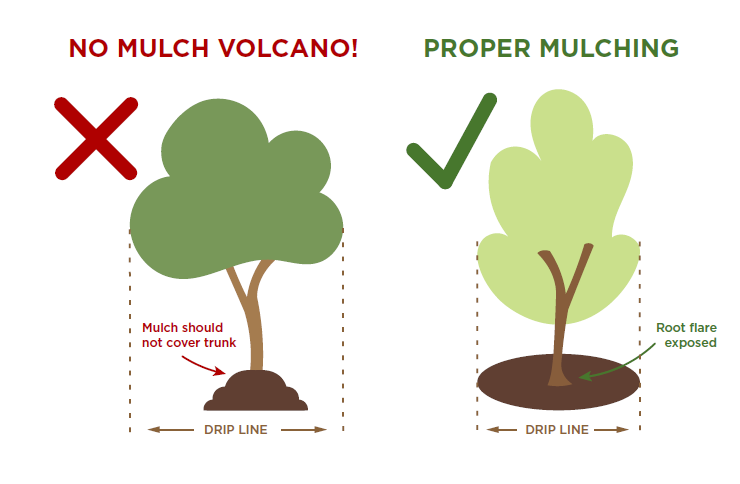
Once your tree is established, long-term care becomes crucial for maintaining its health and ensuring it thrives for many years. Proper root management, mulching, and controlling the tree’s growth are essential practices to keep your tree strong and healthy as it matures. In this section, we’ll explore how to promote healthy root development, mulch effectively, and manage the size of your tree.
How Do I Ensure My Tree Grows Strong Roots?
Strong, deep roots are the foundation of a healthy tree. To encourage your tree to develop a robust root system, consider the following strategies:
- Proper Planting Depth: As mentioned in earlier sections, planting your tree at the right depth is crucial for root health. Ensure that the root flare is at or slightly above the soil level to allow roots to spread naturally. Planting too deep can restrict root growth and lead to root rot.
- Watering: Deep, infrequent watering is essential for promoting strong root growth. Shallow watering encourages roots to stay near the surface, making the tree more susceptible to drought. Water deeply enough to reach the root zone, typically about 8–12 inches deep, and allow the soil to dry out slightly between waterings to encourage roots to grow deeper in search of moisture.
- Soil Aeration: Compacted soil restricts root growth and can prevent roots from accessing essential nutrients and water. To promote healthy roots, periodically aerate the soil around the tree by gently loosening the soil with a garden fork or a specialized aerating tool. This helps improve air circulation and allows roots to grow more freely.
- Mulching: Mulch provides several benefits for your tree’s root system. A layer of organic mulch, such as wood chips or shredded bark, helps retain moisture, regulates soil temperature, and prevents weeds from competing with the tree for nutrients. Apply mulch in a 2–4 inch layer around the tree, keeping it a few inches away from the trunk to prevent moisture buildup and rot.
- Avoiding Root Disturbance: Once your tree is planted, avoid disturbing its root zone. Avoid digging, compacting, or cutting roots, as these actions can damage the tree and hinder root development. Protect the tree’s root zone by maintaining a wide area around it free of heavy foot traffic or construction activities.
What’s the Best Way to Mulch Around a Tree?
Mulching is one of the most effective ways to care for your tree long-term. It helps preserve soil moisture, prevent weed growth, and insulate the roots. Here’s how to apply mulch correctly:
- Choose the Right Mulch: Organic mulch, such as shredded bark, wood chips, or compost, is ideal for trees because it decomposes over time, adding nutrients to the soil. Avoid using inorganic materials, like gravel or rubber mulch, as these do not improve soil quality and can hinder water absorption.
- Apply the Right Amount: A 2–4 inch layer of mulch is typically sufficient to provide the benefits without suffocating the roots. Apply the mulch in a wide circle around the tree, extending to the drip line (the area directly under the tree’s canopy) to cover as much of the root zone as possible.
- Keep Mulch Away from the Trunk: Be sure to leave a gap between the mulch and the trunk to prevent moisture from collecting around the base of the tree. Excess moisture near the trunk can lead to rot, pest infestation, and other issues. Aim to create a small “mulch donut,” where mulch surrounds the tree but is not in direct contact with the trunk.
- Replenish Mulch Regularly: Mulch decomposes over time, so it’s important to replenish it each year to maintain its effectiveness. Always remove any old, decomposed mulch before adding a new layer to prevent the buildup of pathogens or pests.
How Can I Prevent a Tree from Growing Too Large?
While many trees can grow to impressive sizes, some property owners prefer to manage their tree’s growth to prevent it from becoming too large or overwhelming for the space. Here are some strategies to keep your tree within a manageable size:
- Pruning and Shaping: Regular pruning is the most effective way to control the size and shape of your tree. By trimming back excess growth, you can prevent the tree from getting too tall or wide. Focus on removing dead, diseased, or damaged branches, as well as any that grow inward or cross one another. It’s also important to maintain a clear central leader (the main trunk) to ensure the tree grows with a strong structure.
- Topiary and Bonsai: For ornamental trees or smaller varieties, topiary and bonsai techniques can help keep the tree compact. Topiary involves trimming and shaping the tree into specific forms, while bonsai focuses on growing and pruning miniature trees. Both techniques require regular attention and pruning to keep the tree within the desired size.
- Root Pruning: Some trees, especially those with aggressive root systems, may benefit from root pruning to limit their growth. This technique involves cutting back roots that grow too far from the tree’s main root system. Root pruning should be done carefully and by a professional to avoid damaging the tree.
- Select Dwarf or Slow-Growing Varieties: If size is a major concern, consider selecting dwarf or slow-growing tree varieties. These trees are naturally smaller and require less pruning and maintenance to keep them at a manageable size. Research the mature size of any tree before planting to ensure it suits your space.
- Containment Systems: For trees with invasive or aggressive root systems, containment systems, such as root barriers or growth regulators, can help limit their spread. These barriers prevent the roots from growing beyond a certain area, helping to keep the tree’s growth contained.
Specialty Tree Care Questions
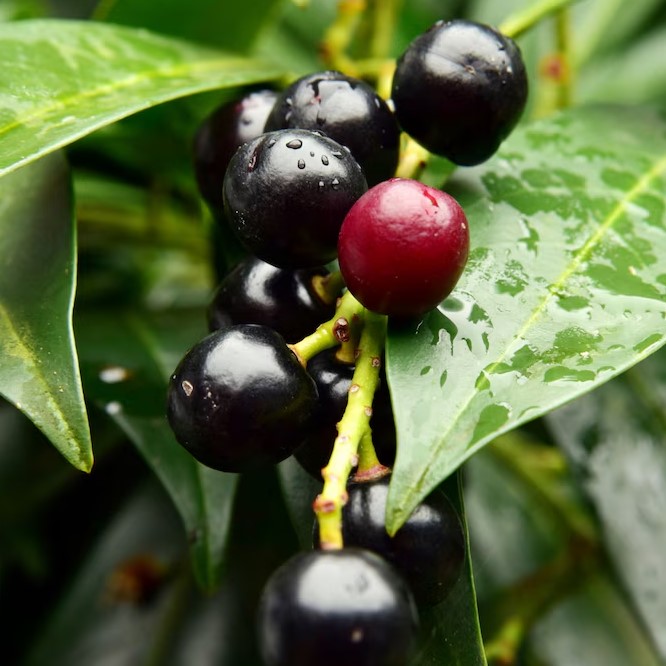
Caring for trees can vary greatly depending on the type of tree and the environment in which it’s grown. While general tree care principles apply to most species, specialty trees—such as fruit trees, ornamental trees, or trees grown indoors—often have unique care requirements. In this section, we will address some common questions regarding these specialty trees.
How Do I Care for Fruit Trees?
Fruit trees require specific care to thrive and produce high-quality fruit. Here’s how to keep them healthy:
- Planting Location: Fruit trees need plenty of sunlight to produce fruit, so choose a spot that gets at least 6-8 hours of direct sunlight daily. Ensure the soil is well-drained to prevent root rot.
- Pruning: Regular pruning is key to maintaining the health and productivity of fruit trees. Prune your tree during its dormant season to remove dead or diseased branches and to encourage new growth. Thin out crowded branches to improve air circulation and light penetration, which helps prevent fungal diseases.
- Watering: Fruit trees need consistent watering, especially during the fruiting season. Water deeply and regularly, but avoid over-watering, as it can lead to root rot. Mulching around the base can help retain moisture and keep weeds at bay.
- Fertilization: Fruit trees benefit from balanced fertilizer that contains nitrogen, phosphorus, and potassium. Avoid excessive nitrogen, as it can promote leafy growth at the expense of fruit production. Follow the manufacturer’s recommendations for the specific type of fertilizer you’re using.
- Pollination: Many fruit trees, such as apple and pear trees, require cross-pollination to produce fruit. Ensure you plant compatible varieties within close proximity to one another to encourage pollination by bees or the wind.
- Pest and Disease Management: Keep an eye out for common fruit tree pests like aphids, caterpillars, and scale insects. Regularly inspect your tree for signs of disease, such as leaf spot or mildew, and treat with organic or chemical pesticides as needed. Neem oil and insecticidal soap are effective natural treatments.
What Makes Ornamental Trees Different to Care For?
Ornamental trees, unlike fruit-bearing or timber trees, are grown primarily for aesthetic purposes, and their care is often focused on maintaining their appearance. Here’s what you need to know:
- Pruning for Shape and Size: Ornamental trees may require more frequent pruning to maintain their shape and size, especially if they are used in landscaping or as specimen trees. Regular trimming helps preserve the desired form and removes dead or unattractive branches.
- Soil and Fertilization: While ornamental trees generally have similar soil requirements to other types of trees, some may need more acidic or alkaline soil depending on their species. Choose the right soil for your tree type and fertilize as needed to encourage healthy growth and vibrant foliage.
- Disease and Pest Management: Ornamental trees can be prone to specific pests, such as aphids, caterpillars, and leaf miners. Regularly inspect for these and take prompt action to manage pests. Ornamental trees may also be more susceptible to fungal diseases that affect the leaves or bark, so be proactive with fungicide treatments if necessary.
- Watering Needs: While ornamental trees typically have moderate water requirements, they may need more water during dry spells, especially if their roots are shallow. Mulch can help retain moisture and protect the roots from extreme heat.
- Environmental Stress: Ornamental trees are often planted in urban or landscaping environments where they face stresses like compacted soil, pollution, and limited root space. To help your tree thrive, avoid over-crowding and provide adequate room for roots to expand, and ensure that it gets sufficient sunlight and air circulation.
Can I Grow Trees Indoors or in Pots Permanently?
Growing trees indoors or in pots is possible, but it does come with certain challenges. Here’s what to consider if you’re planning to grow a tree indoors or in a container:
- Choose the Right Tree: Not all trees are suitable for growing indoors or in pots. Dwarf or slow-growing varieties, such as certain fruit trees, ornamental trees, and small evergreen trees, are better suited for indoor environments. Look for species that thrive in confined spaces and can adapt to indoor conditions.
- Pot Size and Drainage: If you’re growing a tree in a pot, choose a container large enough to accommodate the tree’s root system. The pot should have drainage holes to prevent water from pooling, which can lead to root rot. It’s important to choose a pot that allows the roots to grow comfortably for several years, as frequent repotting can disturb the tree’s growth.
- Light and Temperature: Indoor trees require sufficient light to grow, so place your tree near a bright, south-facing window. If natural light is insufficient, consider using grow lights to provide additional illumination. Indoor temperatures should generally range from 60-75°F (15-24°C), and avoid placing the tree near drafts, radiators, or heat vents.
- Watering and Fertilization: Trees in pots often need more frequent watering than those planted in the ground. Be sure to water deeply when the top inch of soil is dry. Fertilize periodically, using a balanced liquid fertilizer, to provide the nutrients your tree needs to thrive indoors. Be careful not to over-fertilize, as this can cause damage to the roots.
- Repotting and Root Pruning: Indoor trees in pots may become root-bound over time, meaning the roots have outgrown the pot. Repot the tree every 2-3 years, or as necessary, to prevent the roots from becoming too cramped. During repotting, trim any overgrown or tangled roots to allow for better growth.
- Pest Control: Indoor trees can still fall victim to common pests like spider mites, aphids, and scale insects. Keep an eye out for these pests and treat them promptly using insecticidal soap or neem oil.


